Headless CMS > Extending Functionality
Define Content Models via Code
Learn how to define content models and content model groups programmatically.
Overview
Content models and content model groups can be defined in two ways.
Via the Admin Area
The most straightforward way to define content models and content model groups would be via the Admin Area application, via the Content Model Editor and the Content Model Groups module. This is especially suitable for users that are not developers, and just want to manage everything in a quick and easy way.
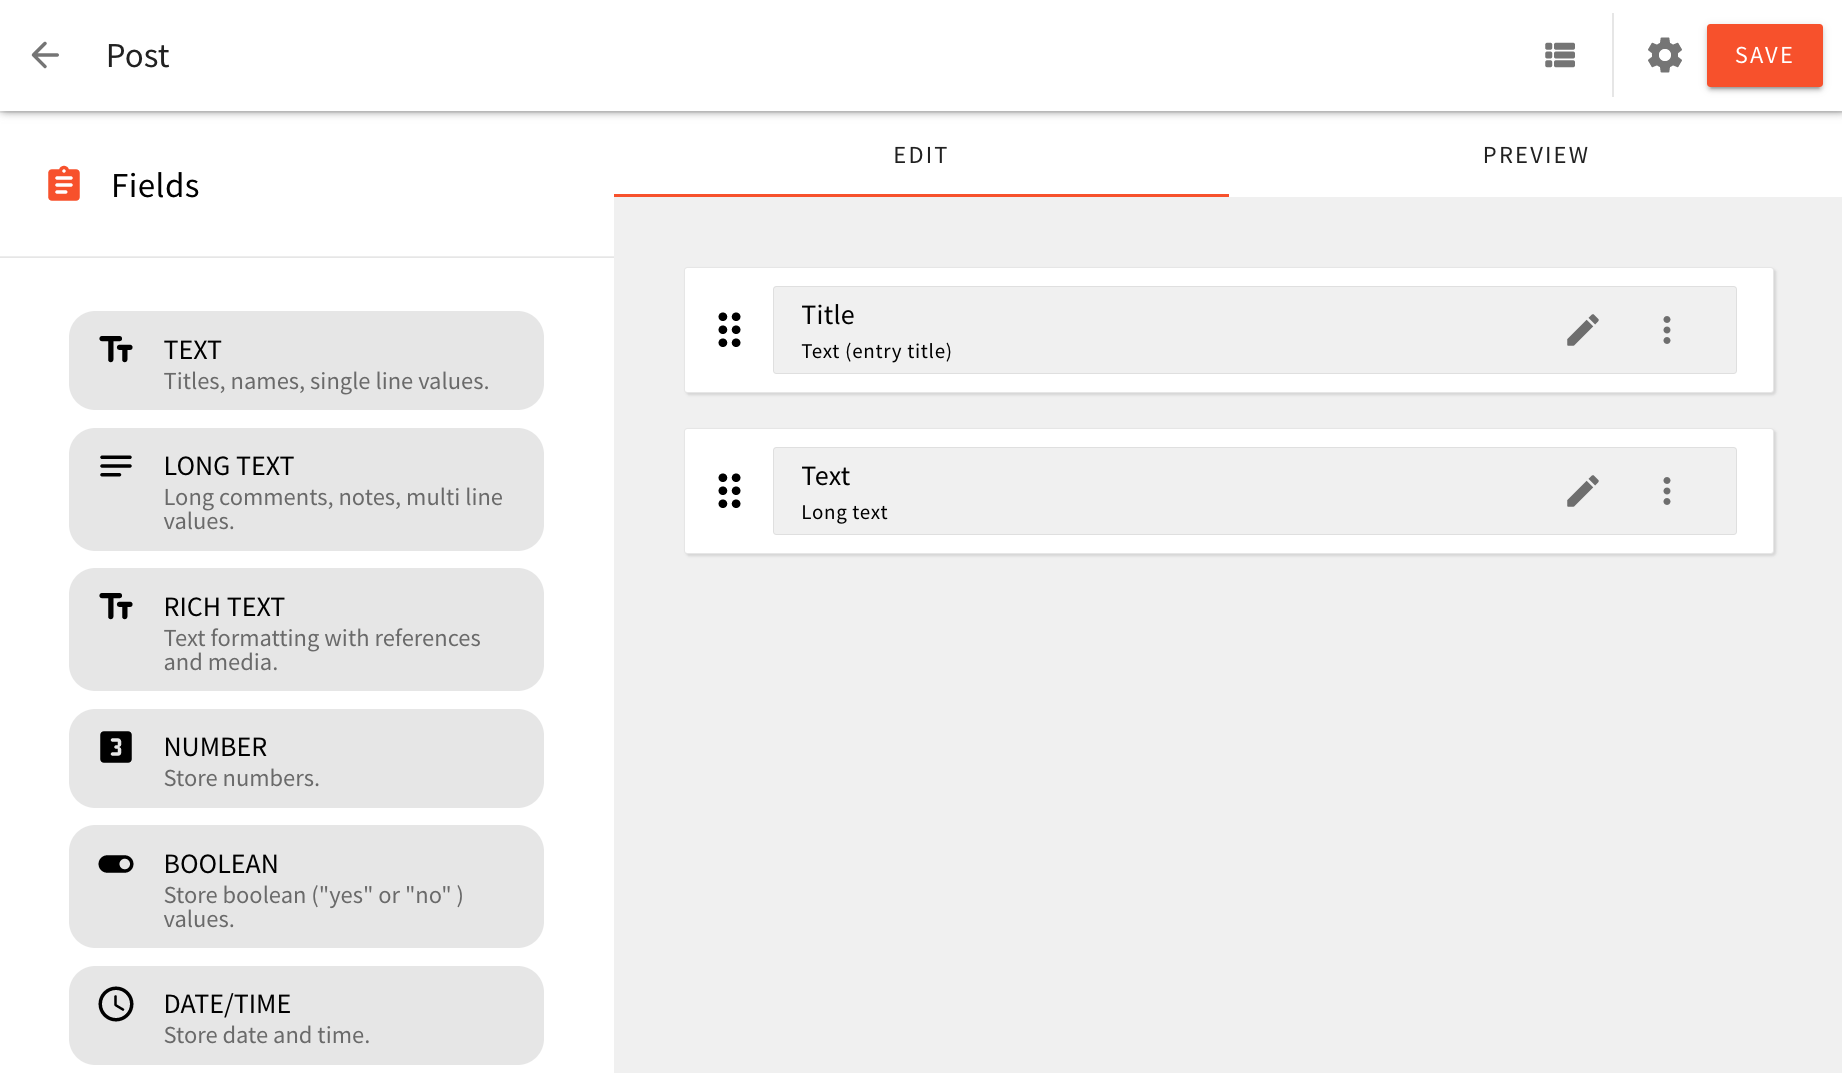 Defining Content Models and Content Model Groups via the Admin Area Application
Programmatically
And although we can get pretty far by defining content models and content model groups via the Admin Area, on the other hand, we can also do this within our application code, by creating a new extension. Once defined, content models and content model groups can be then used via the Admin Area in the same way as if they were created regularly, via the Content Model Editor.
Some of the benefits of this approach are:
- content models and content model groups get to be stored in version control
- since everything is done programmatically, in some case we may receive additional flexibility
- by default, defined content models and content model groups are available for all available locales and tenants
- basically, only developers have the ability to perform changes on content models and content model groups
In the following sections, we cover a couple of examples that show how to define content models and content model groups via plugins.
Getting Started
To get started, we first scaffold a new API extension in the /extensions/models folder, via the following command:
yarn webiny scaffold new-extension \
	--type api \
	--name models \
	--dependencies @webiny/api-headless-cms
Since we'll be using a couple of utilities from the @webiny/api-headless-cms package, we've immediately included it in the list of dependencies. Also, note that the scaffolded files can be used for all of the examples shown in this guide.
Once the extension is scaffolded, in order to start developing, we run the followingwebiny watch command:
yarn webiny watch api --env ENVIRONMENT_NAME
Basic Example
In this example, we define a simple Product content model, that belongs to the E-Commerce content model group.
To create a content model group and a content model, we use createCmsGroupPlugin and createCmsModelPlugin plugin factories, as shown in the following code snippet.
As we can see, first we define a new content model group via the createCmsGroupPlugin plugin factory. The following properties are required:
id- a unique identifier of the content model groupname- the name of the content model groupdescription- a short description of the content model groupslug- a unique identifier of the content model group, used in URLsicon- the icon of the content model group (more info in the FAQ section)
Furthermore, upon calling the createCmsModelPlugin plugin factory, we get to define all of our content model’s properties, like its name, ID (modelId), a content model group to which it belongs to, and most importantly, all of the fields that it consists of.
Fields of a content model are defined via the fields property, which is an array of CmsModelField objects, which we create via the
 createModelField factory function.
Note that some of the properties that we need to define for each field are simpler than others, for example label or placeholderText. On the other hand, properties like type, renderer.name, and validation.name contain values that actually reference other plugins. In case an invalid reference was provided, an error will be thrown and you will have to make corrections.
All available field types
(type), field
renderers
(renderer.name),
and field validators
(validators.name) can be
found in our GitHub repository.
Want to learn how to create your own custom field type? Check out the Create a Custom Field Type how-to guide.
Ultimately, with this code in place, we should be able to see the following two items in our Admin Area main menu:
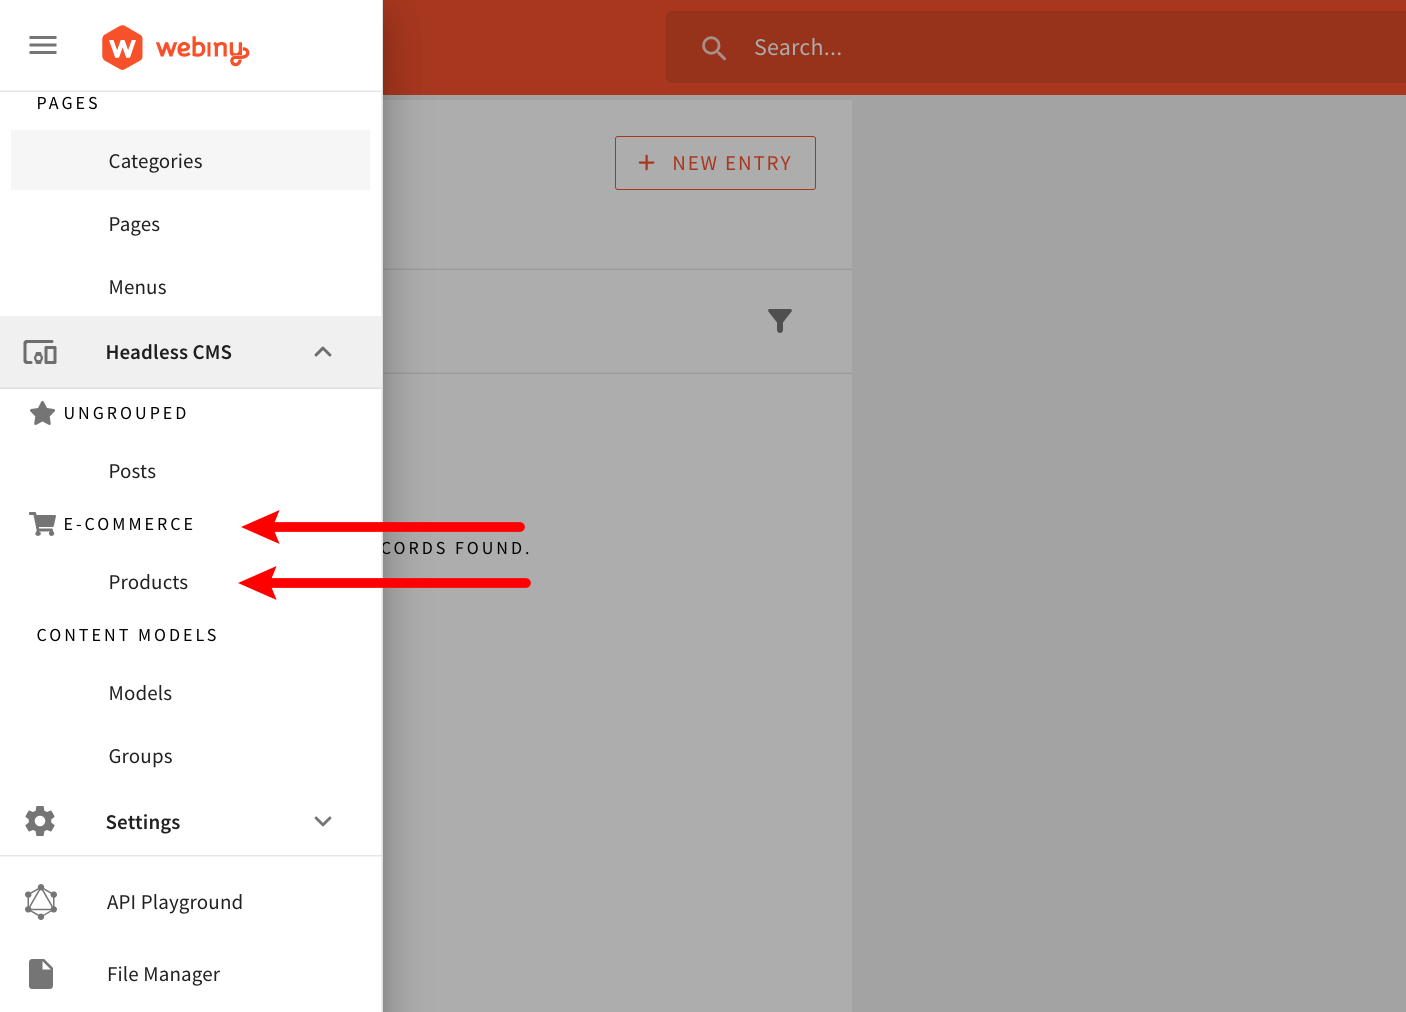 E-Commerce Group and Product Model
Note that both the Product content model and the E-Commerce content model group will be available for all existing locales and tenants. If you’re interested in defining a content model only for a specific locale or tenant, check out the examples below.
More Examples
Model Field With Multiple Validators
In this example, we define a new Product Category content model, which consists of a single field: Name. We also add two validators to the field: required and unique.
A list of all available field validators can be found in our GitHub repository.
Reference Fields
In this example, we add a new field to the Product content model that we created in the basic example. The new field is called Category, and it is a reference field that references the Product Category content model.
The following screenshot shows the Product content model with the Category reference field.
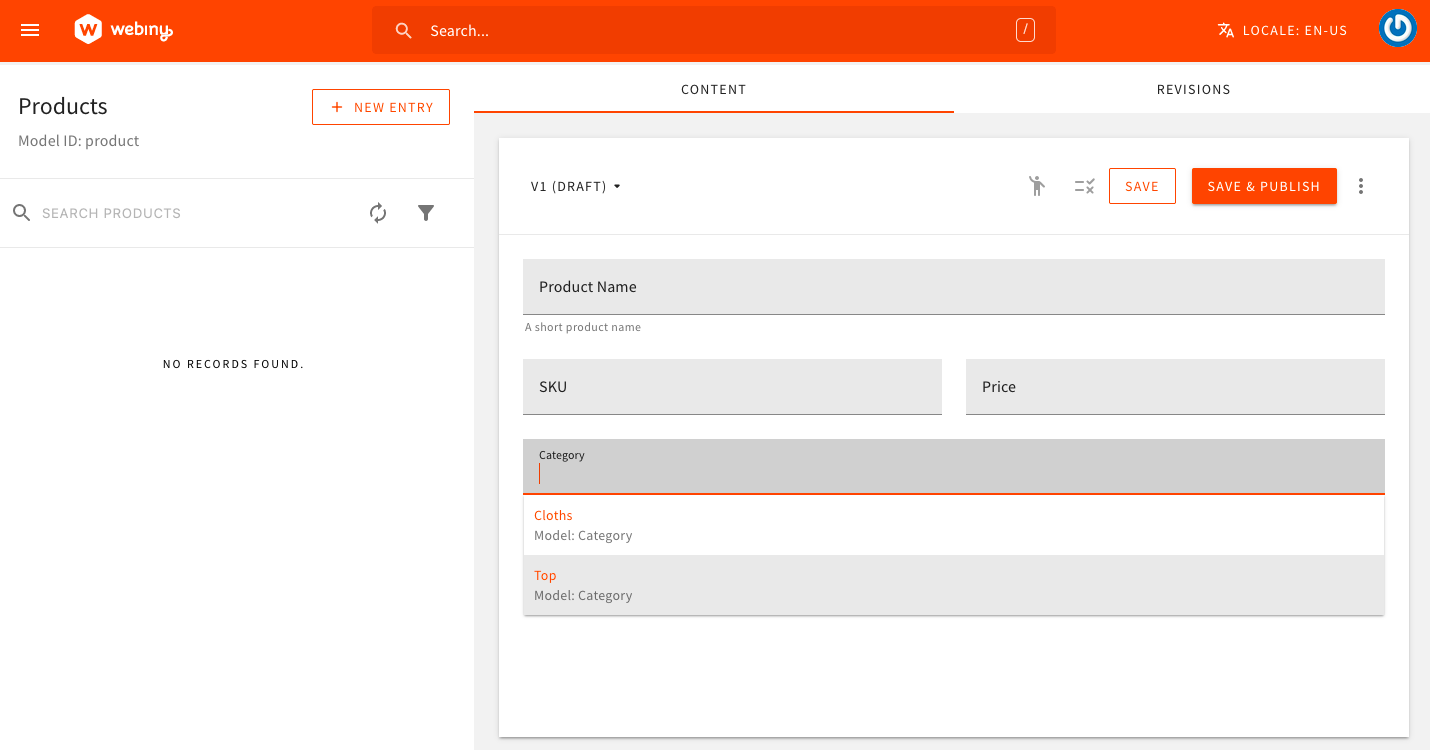 Product Model
Object Fields
In this example, we define a new Product Review content model, which consists of three fields: Reviewer Name, Rating, and Review.
The Review field is an object field that consists of two subfields: Review Title and Review Description. Also, via the multipleValues: true flag, the Review field is set to allow multiple values. In other words, a single product review can consist of multiple review titles and descriptions.
Disable Authorization for Content Models and Entries
With this 5.39.2 release, upon defining content models programmatically, developers now also have the ability to disable authorization checks for the content model and its entries. This can be useful when you want to quickly grant full access to all authenticated users, without the need to have the required security permissions in place, defined via the Security application.
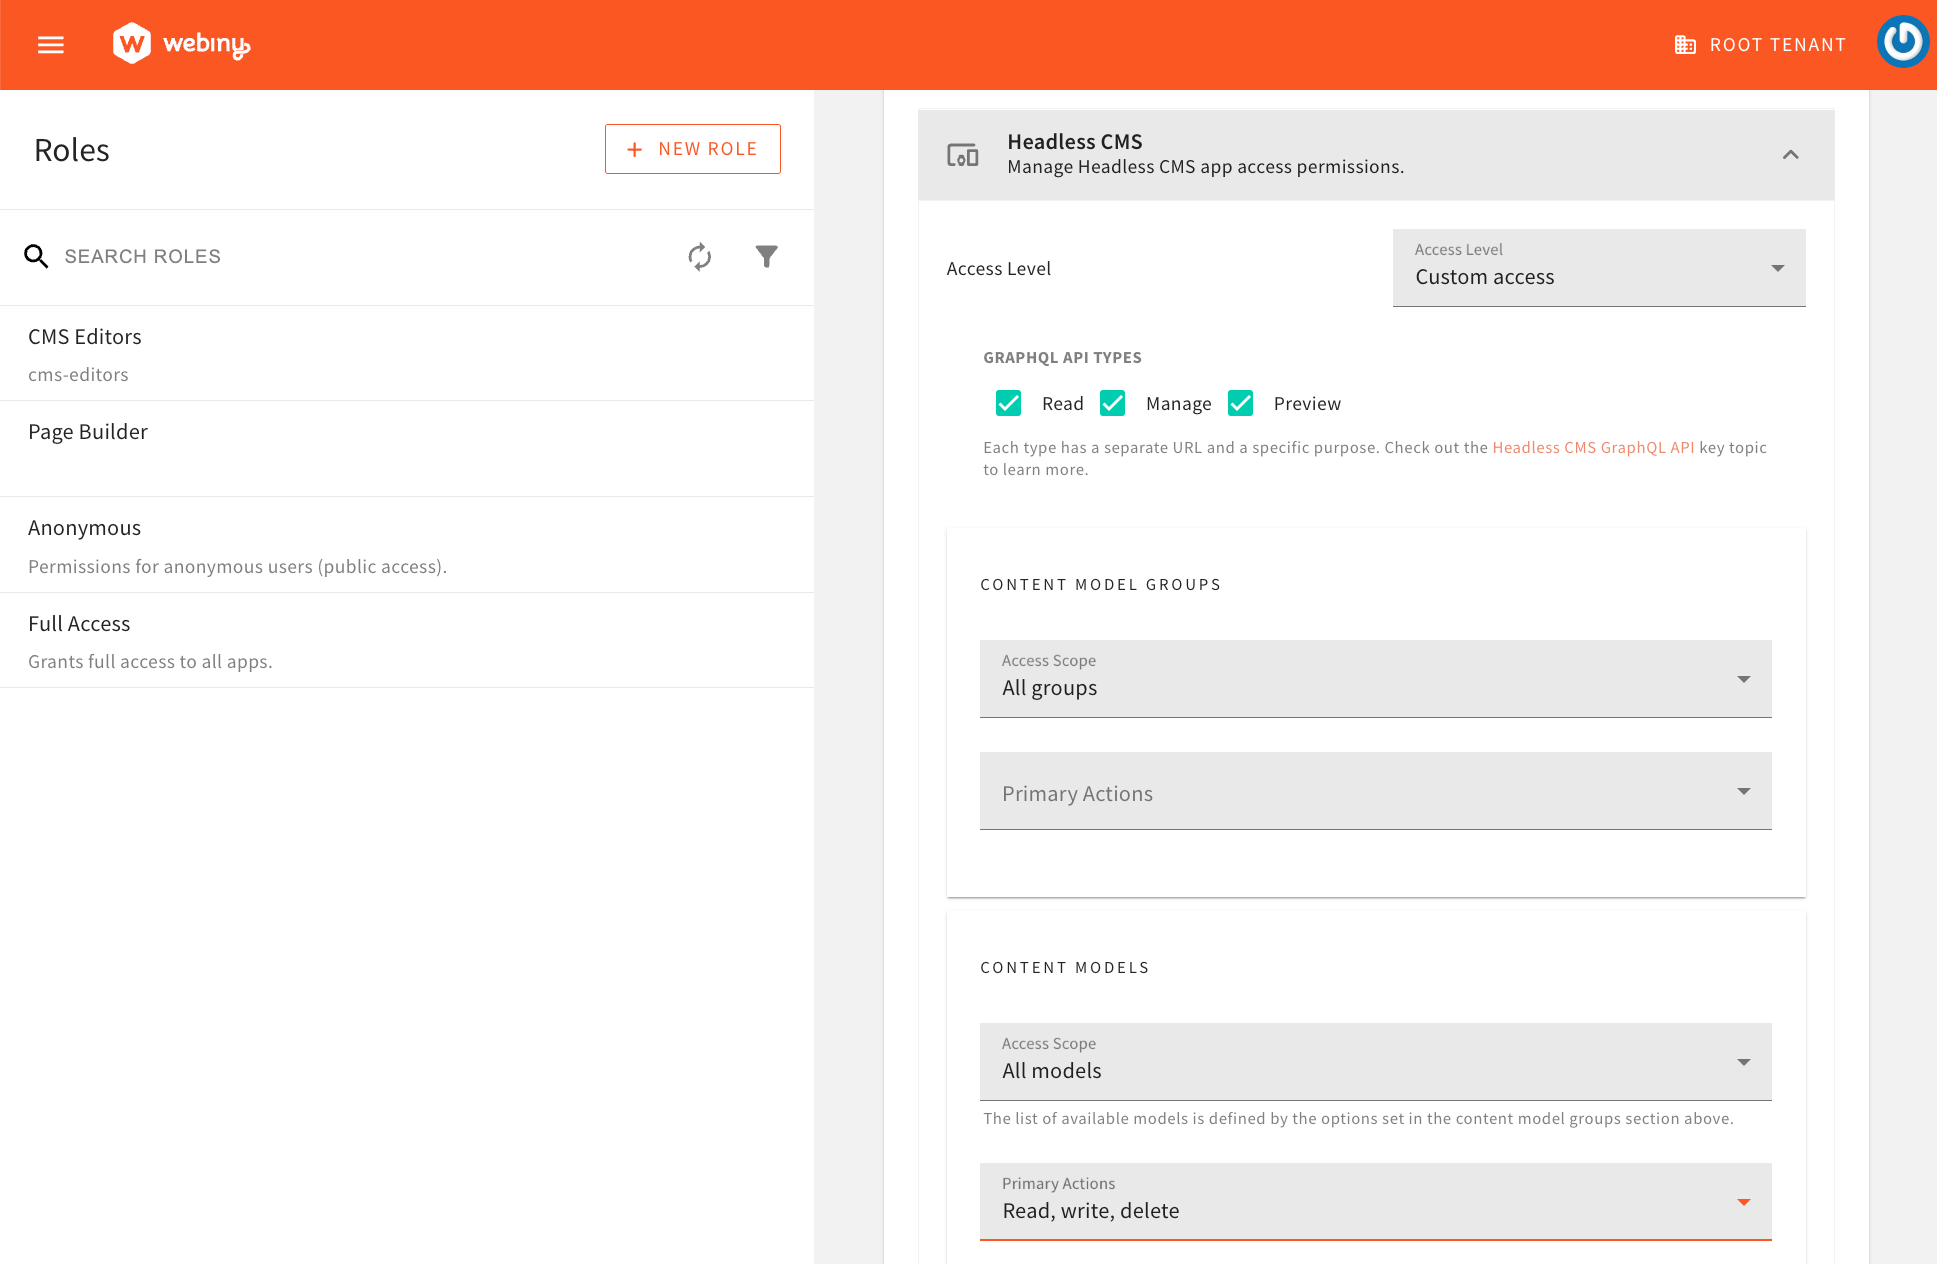 Security Permissions Defined via the Security Application
Additionally, in case the Folder Level Permissions feature is enabled in your Webiny project, the content model entries will not be subject to folder level permissions.
The following example demonstrates how to disable authorization for a content model and its entries.
With the authorization property set to false, base authorization checks are disabled for the content model and its entries. Furthermore, in case the Folder Level Permissions feature is enabled in your Webiny project, the content model entries will not be subject to folder level permissions.
Define a Content Model Only for a Specific Locale
In this example, we show how we can define content models and content model groups only for a specific locale, in our case, the en-US.
As we can see, we’ve used the createContextPlugin first in order to create a new context plugin and to first be able to access the dynamic context object and the context.i18nContent.getLocale method. Once we’ve determined that the en-US is the current locale, we proceed by registering the neccessary plugins.
Define a Content Model Only for a Specific Tenant
In this example, we show how we can define content models and content model groups only for a specific tenant, in our case, the root.
As we can see, like in the previous example, we’re again utilizing the createContextPlugin plugin factory, in order to be able to access the dynamic context object, and the context.tenancy.getCurrentTenant method. Once we’ve determined that the root is the current tenant, we proceed by registering the necessary plugins.
Best Practices
When defining content models programmatically, there are a couple of best practices that you should follow.
Some Field Properties Must Never Change
When defining content models programmatically, there are a couple of properties that should not be changed once the content model is created. Changing these properties can lead to data loss, and in some cases, even to data corruption.
When it comes to content models, the modelId property of the content model should never be changed. Changing the modelId property can lead to data loss, as the data stored in the database will no longer be associated with the content model.
When it comes to content model fields, the following properties should not be changed:
idstorageId(if you have defined it manually)typemultipleValuespredefinedValues(you can add values but do not remove them)
Furthermore, within the settings object, the following properties should not be changed:
settings.fields- same rules apply as for the parent fieldsettings.models- you can add models but do not remove themsettings.type
FAQ
Can Content Models (And Groups) Defined Programmatically Be Edited via Admin Area?
Content models and content model groups that were defined programmatically cannot be edited via Admin Area (via the Content Model Editor and Content Model Groups module). All of the changes need to be done within the application code.
How to Set a Default Value for a Field?
You can set a default value for a field using the defaultValue property. For example:
In short, you will need to add settings.defaultValue property to define a default value to a field.
Are There Any Differences When It Comes to Security Controls?
When it comes to security, both ways of defining content models and content model groups have access to the same features and follow the same security-related built-in mechanisms. In other words, via the Security application, you can still decide which users have access to particular content models and content model groups that were defined via plugins, and which don’t.
Can I Convert a Content Model That Was Defined via Admin Area Into a Plugin (And Vice-Versa)?
You can, but this will require a bit of manual work. You will have to find the content model record directly in the Amazon DynamoDB table, and copy the data into your application code and try to fit it into the createCmsModelPlugin plugin factory.
If you’re doing this and require additional assistance, feel free to contact us over our community Slack.
What Are the Values That I Can Pass to theiconProperty of theCmsGroupPluginPlugin?
When defining content model groups via Admin Area, we pick its icon via a simple drop-down menu:
On the other hand, when defining content model groups via a plugin, we need to specify the icon manually, by setting the same string value that would be set once an icon was picked from the above seen drop-down menu.
By default, we include three free sets of Font Awesome icons (via the Fort Awesome library): regular, solid, and brands. So, when defining your plugin, simply use the icon code listed on the set’s icons list page, prepended with the set code.
Here are a couple of examples of specifying icons from solid, regular, and brands sets:
fas/shopping-cartfas/id-card-altfar/address-bookfar/copyfab/aws.fab/react.
What Is the Purpose oftitleFieldIdin the Content Model Definition?
The titleFieldId in a content model is used to specify which field should be used as the title for the entries of that content model. This is a text field that provides a human-readable summary of each entry.
For example, a blog post content model might consists of three fields: Title, Body, and Author. By setting titleFieldId to the Title field (its field ID: title), the value of the field will be used as the title for each blog post in the list of all blog posts.